Subsetting
Speed up your site by creating a super-lean, super-fast subset of Font Awesome! Choose just the icons you need then serve them up as a subset on your site or app to make it faster than ever.
What is a Subset?
A subset is just a smaller set of something. So, a Font Awesome subset has only some of the icons but still includes all the awesome utilities, styling, and ability to easily add icons into your project.
Since Font Awesome has a LOT of icons - and we're adding more all the time - you're probably not using all of the icons in a project. Slimming down to just the ones you're using can keep your team aligned on the desktop and improve performance on the web.
You can create a subset easily by adjusting your Kit's Icon Selection, or selecting just some styles when hosting yourself.
Subset Options
Font Awesome offers a number of options for subsetting:
| Icon Selection Mode | Description | Level |
|---|---|---|
| Full Library - Pro (Kits) | No subsetting - Includes all icons in all styles. No configuration needed. | The easy option. All icons available, largest Kit size. |
| By Style (Kits) | Includes all icons in only your chosen styles. | A nice medium option to slim down but still have the flexibility to try out a variety of icons. |
| By Icon (Kits) | Hand-pick exactly the icons your project needs. Smallest Kit, fastest load. | The most nitty-gritty option for full control. |
| Select Styles (Host Yourself) (Web Fonts or SVGs+JS) |
Download all of Font Awesome and pick the styles to include in your self-hosted environment. | A manual option where you do all the subsetting work. |
Full Library (Kits)
Full Library includes all icons in all Pro (and Pro+) styles — no configuration needed. This is an easy option when you want access to everything without worrying about managing a subset, and don't mind loading everything.
To use the full library, go to your Kit, click the Icon Selection button, and select "Full Library".
By Style (Kits)
With By Style, you can pick which styles you want included in your Kit. You'll have access to all the icons for the styles you choose, but none of the extra load for styles you aren't using. This is a nice middle ground — smaller Kit, faster load.
Your Kit will not include any icons except your custom uploaded icons until you select the styles you want to include. If you're using your Kit in production, make a copy, get your subset set up, then swap your Kit embed code in your project.
To subset by style, go to your Kit's Icons tab, click the Icon Selection button, select "By Style" and save:
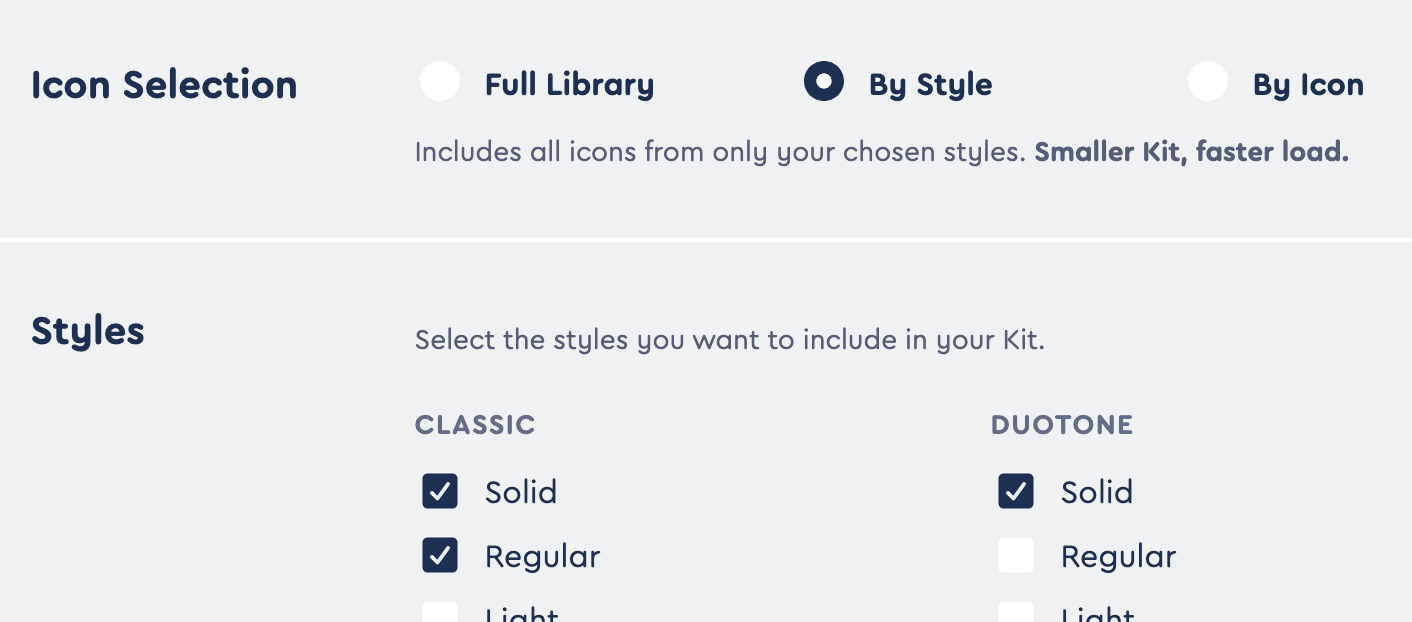 By Style Icon Selection in Your Kit
Then select the styles you want to use - if you have access to Pro+ icon collections, you'll see those listed there as well - and save again. Voila! Your Kit is now serving only the icons in those styles.
FYI: Our SVG+JS method is already super-efficient when loading the Full Library so you don't need to subset by style when your Kit is set to use SVG+JS. If you choose to subset by style, we'll switch your Kit to use Web Fonts.
By Icon (Kits)
If you know exactly which icons you want to include, subsetting "By Icon" gives you full control to slim things down as much as possible. Hand-pick exactly the icons your project needs for the smallest Kit and fastest load. Just keep in mind you'll need to come back to add icons when you want to use new ones.
Your Kit will not include any icons except your custom uploaded icons until you select the icons you want to include. If you're using your Kit in production, make a copy, get your subset set up, then swap your Kit embed code in your project.
To subset by icon, go to your Kit's Icons tab, click the Icon Selection button, select "By Icon" and save.
Now you'll need to pick the icons you want to use in your project and add them to your Kit.
Adding Icons to Your Kit
There are two ways to add icons to a Kit with "By Icon" enabled:
Browse and Add from the Icon Search
The easiest way to build your subset is right from the Font Awesome Search:
- Search or browse for icons on fontawesome.com.
- Click the button in the upper left of any icon to select it. A tray will appear at the bottom of the page showing how many icons you've selected.
- Manage your selections by clicking "Manage Selection" in the tray to see all your collected icons. You can also remove any you don't need.
- Select your Kit from the dropdown in the tray. Only Kits set to subset "By Icon" will appear here.
- Click "Add to Kit" to add all your selected icons to the Kit.
From the Kit Icons Tab
You can also manage your icon selections or search for more directly from your Kit's Icons tab.
Using a Subsetted Kit
Once you have picked the styles or icons you want to include in your Kit, you can use it in any of the ways you usually would use a regular Kit to get icons into your project.
In Web-based Projects
Hosted via Embed Code
Use the JS (or CSS) Kit embed code that you'll find on your Kit's page just like a regular Kit, and your Kit will deliver only the icons you have included in your subset.
Download
Download your subsetted Kit from the Download link on your Kit's page and use it to self-host as Host Font Awesome Yourself with Web Fonts + CSS or Host Font Awesome Yourself with SVGs + JS. The download will only contain the icons you included in your subset. And if you make changes, don't forget to download and install the updated files!
View what's in a subsetted Kit download for Web.
When you're self-hosting a SVG+JS subsetted Kit with Sharp icons, all the icons and utilities for Classic AND Sharp will be included in the all.js file - you don't need to add any sharp- files. (This is different from the way you would use the regular Font Awesome download which needs both all.js and any sharp- style files.)
In Desktop Apps
Download
Download your subsetted Kit from the Download link on your Kit's page and use it just like regular Font Awesome in your desktop apps. The download will only contain the icons you included in your subset. And if you make changes, don't forget to download and install the updated files!
View what's in a subsetted Kit download for Desktop